Showing posts with label dessert. Show all posts

Tuesday, January 17, 2012

Vive la Bretagne : ICE Revisited

As some of you may remember, I had the pleasure of taking my very first cooking class this past Fall. Ever since attending "Elegant Autumn Desserts" with Chef Vicki Wells at the Institute for Culinary Education in downtown Manhattan, I'd been aching to go back and try my hand on some other delicacies.

The Institute for Culinary Education is located on 23rd street between 5th and 6th avenue, and offers a full range of recreational cooking classes for those interested in cooking, baking, wine and bar-tending, and cheese.

This time around--motivated by the gift of two cooking classes of my choice for Christmas--I decided to opt for a cooking class as opposed to a baking class. People always ask me what I prefer--cooking or baking. I'd have to say that I prefer baking, because it just comes to me more naturally. There seems to me that there is less room for error, and who could say no to working with ingredients like cream, chocolate, and sugar? I do enjoy cooking though, even though it does not come as easily to me.

This time around, I chose Vive la Bretagne, a celebration of tradition Bréton cuisine. The class was taught by Chef Hervé Riou who is an ambassador of Breton cuisine in the United States, representing the Union Culinaire Bretonne. My motivations for taking this particular class were twofold: first, my family originates from Brittany, the northwestern peninsula of France that projects into the Atlantic Ocean, and, second, I was looking to acquire some tricksy cooking skills.

The class was limited to 20 people and was spread over four hours on a Monday morning. The price was reasonable, considering the time in the kitchen, the price of the materials, and the fact that you got to take bags of goodies home. (I have what must amount to three rabbits in my fridge.)

Within our four hours we made Salade de Roscoff (salad of warm seasonal vegetables in an herb vinaigrette), Timbale de saumon aux herbes et fenouil marinée (smoked salmon served with marinated fennel in lemon and creme fouette with shallots confit), Soupe de poisson cotriade (traditional fish soup), Medaillons de veau à la mode d'Iffiniac (sautéed veal medaillons with Muscadet, onion and grated cheese), Coquille St Jacques à la Concarnoise (pan-seared scallops served with a ragout of chanterelles or wild mushrooms and a vermouth reduction), Lapin sauté aux herbes de Bretagnes (rabbit braised with mushroom shallots parsley and a white wine-herb infusion), Flan de St Enogat (flan with marc of cider and apples or pears caramalized), and Traou Mad (traditional butter cake).

Each one was relatively simple to make, and came out looking and tasting divine. Each used tools and ingredients that are easily available and that shouldn't be too much of a drain on the budget.

Look for each recipe as I remake them in the confines of my home kitchen in the next few weeks!

Wednesday, December 21, 2011

Butterscotch Scotch Eggnog

I had never been a huge fan of eggnog--until I found this recipe in the New York Times last year in December of 2010. My indifference towards eggnog was two-fold: first, my family had never entertained large groups of people during the holidays, and so we never made eggnog; second, whenever we had had a craving for thick and creamy goodness we would just purchase a carton of eggnog from the store. Store-bought eggnog can satisfy a rare craving, but its astronomical sugar counts and artificial flavoring quickly overshadow the pleasure of drinking it.

This recipe changed my attitude towards eggnog: yes it's rich, due to the large number of fresh, raw eggs and alcohol, but the taste knocks all other eggnogs out of the park. Even if you're not a huge fan of eggnog, you might be surprised by this recipe. It's at least worth a go for a once a year treat!

The Recipe:

As mentioned above, this recipe was printed in the December 3, 2010 edition of the New York Times. 

12 large eggs, separated
1 cup dark brown sugar
2 teaspoons pure vanilla extract
1/2 teaspoon kosher salt, plus pinch
2 cups whole milk
1 cup smoky Scotch whisky
1/2 cup brandy
2 cups heavy cream
4 tablespoons granulated sugar
Grated nutmeg.

In a large bowl, combine the yolks, brown sugar, vanilla and 1/2 teaspoon salt. Using an electric mixer beat on medium-high speed until thick and dark golden, about 3 minutes. Reduce the speed to low and slowly drizzle in the milk, Scotch and brandy. Transfer to the freezer to chill while preparing the rest of the eggnog. (Or refrigerate for at least 2 hours before completing.) 

Meanwhile, in a medium bowl, whip the cream on medium-high speed until soft peaks form. Set aside. In another medium bowl, using clean beaters, whip the egg whites and pinch of salt on medium-high speed, adding the sugar by tablespoons until soft peaks form.

When the eggnog is ready to serve, pour the yolk mixture into a large punchbowl. Fold in a small amount of whipped cream to lighten it, then fold in the remaining cream. Fold in the egg whites. Generously dust the top with nutmeg; serve immediately.

This can also be kept in an airtight container in the refrigerator for up to 3 days.


Serves 12. 

Tuesday, December 20, 2011

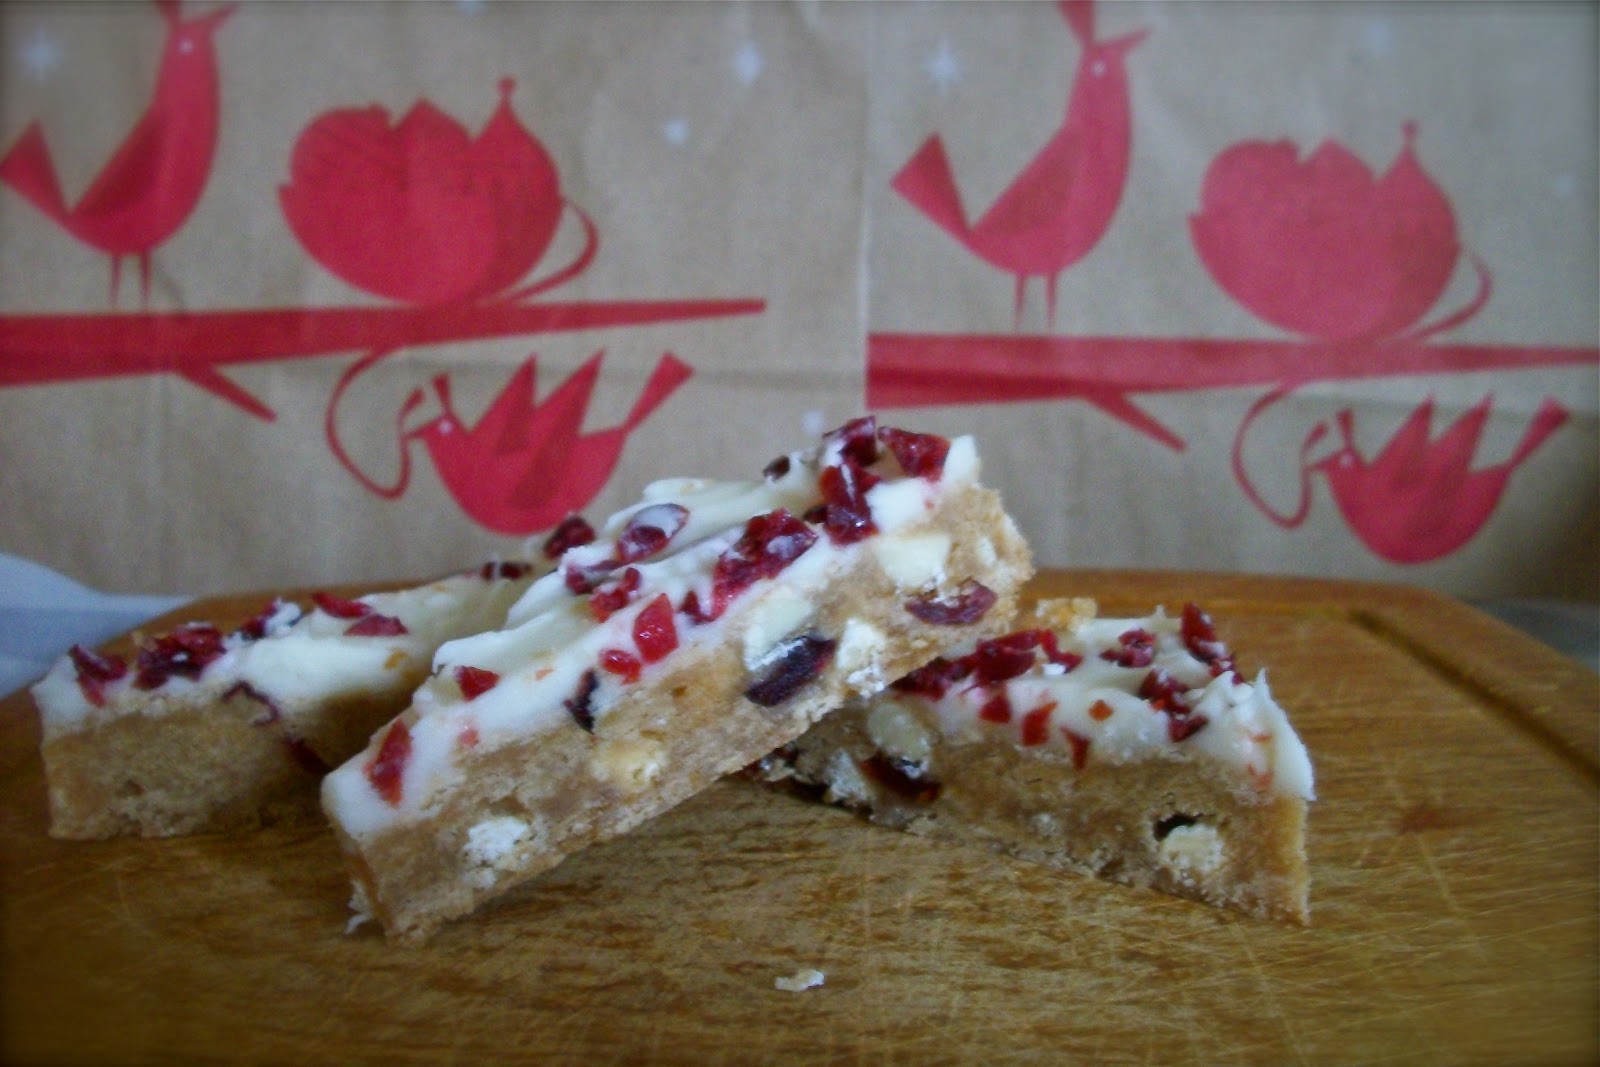
Cranberry Bliss Bars

Every Winter, the global coffee chain, Starbucks, captivates our taste buds with an arsenal of holiday concoctions--from gingerbread and eggnog lattés to peppermint and salted caramel hot chocolate. But Starbucks' holiday charms don't just lie in their wide choice of beverages, but in their selection of baked goods. The cranberry bliss bar is a delicious treat that appears only around the holidays, and that pairs wonderfully with a cup of coffee or cocoa on a wintry day.

While cranberry bliss bars can be a tad bit expensive, this copy-cat recipe will keep your sweet tooth happy without breaking the bank. They even taste the same--so much so, that today I was alternating bites between a "real" bar and one of these and tasted no difference. So, whip up a batch of these, brew a cup of coffee, and let it snow!


The Recipe:


This will make 42 triangle-shaped bars.


For the bars:

1 cup butter (2 sticks, very soft)

1 cup dark brown sugar

1/3 cup sugar

3 large eggs

2 tsps either orange or vanilla extract

2 cups all-purpose flour

1 1/2 tsps baking powder

1 tsp ground ginger

3/4 cup craisins

3/4 cup white chocolate chips


For the frosting:

3 ounces softened cream cheese

2 tbsps unsalted butter

3 cups confectioners' sugar

1 tsp orange or vanilla extract


For the topping:

1/3 cup chopped craisins

1-2 tbsps orange zest

1/3 cup white chocolate chips

1/2 tsp canola oil

Preheat the oven to 350 degrees farenheit and line a 10x15" pan with parchment paper.

Using an electric mixer, cream the butter and sugars together for about three minutes until light. Add each egg one at a time and add the extract. Add the flour, baking powder, and ginger and mix until just incorporated. Add the cranberries and chips and mix.

Spread the batter evenly and bake for 20-25 minutes until brown only at the edges (or until a knife comes out clean). Cool completely.

For the frosting, cream together the cream cheese and butter, then the extract. Then add the confectioners' sugar and beat until fluffy. Spread evenly over the cooled bars.

To make the garnish, sprinkle the zest over the bars and add coarsely-chopped craisins. To make the white chocolate drizzle, mix the and oil in a glass measuring cup and microwave for 1 minute, stirring every 15 seconds until melted. Use a fork or whisk to drizzle the white chocolate diagonally across the bars.

Allow one hour for the white chocolate to set before cutting and refrigerate. Cut into triangles for the signature Starbucks' look!

Monday, December 19, 2011

Holiday Helper : Mailing Cheer

If you've ever tried to send baked goods or sweets in the mail, you know that it can be a little tricky. Will the cookies break? Will the truffles melt? Will they go stale? How should I ship them, and will it eat my paycheck? These are all questions that make choosing and packing holiday treats a challenge.

You can easily alleviate these concerns, however, by carefully planning what you make and how you pack it. Here are some techniques for choosing and shipping baked goods easily and inexpensively:

1. Choose the right recipe: Not every baked good can be sent in the mail (without unfortunate results). Linzer tortes or delicate lattice suar cookies will not survive being jostled in a box, and chocolate truffles might end up becoming a sticky mess. Your best bet is to choose a high-endurance option that will not melt or break after being tossed around.

Here is a list of cookies and baked goods that do well in the mail:

a. Chocolate Crinkles

b. Oatmeal Raisin / Craisin Cookies


c. Chocolate Chip Cookies


d. Gingerbread Cookies


e. Fruitcake


f. Fudge


g. Biscotti


Of course, your options are not limited to my suggestions. If you have made something that seems like it could survive a few days in transit, go ahead and try it out!

2. Having the right equipment: Even if you have chosen a durable recipe, you need to choose durable packaging, as well, or you run the risk of your cookies arriving intact but stale. Purchase some tupperwares or metal cookie tins that will keep your treats air-tight and fresh, even after several days.

3. The Packing game: Your packaging of the treats will depend largely on what you are sending. For some cookies, you might want to wrap each individually in saran wrap. If you're sending fruitcake, wrap it tightly in plastic. For other items, being wrapped together will suffice. Always line your tins and containers with foil and wrap it around the contents before closing. This will ensure extra freshness.

4. The final touches: Once your tins and containers are sealed, it's time to pack them in a box. Pad the box with crumpled newspapers which will absorb shock and ensure tight packing and minimal jostling. Place your tin / box on the newspapers, and pad any empty areas with tissue paper or more newspaper. Finish with another paper layer, and, closing the box temporarily, shake it gently to see if anything is loose. If everything seems bolted down, tape the box closed.

5. Mailing options: You can mail baked goods without breaking the bank. In my experience, there is no need to use specialty shipping services such as FedEx and UPS. They're very expensive and won't provide that much of an advantage. If you've chosen durable treats and packed them well, there will be no need to rush the package (unless you're running late, of course!).

For most packages, the USPS will suffice. Flat Rate Priority boxes are often a good choice, as they will arrive quickly, and can be obtained for free at your post office (no buying boxes!). The downside is that, depending on the weight of the box, the flat rate might be a little pricey. Weigh the box you are sending and determine whether it is worth it to do flat rate. For example, if you are mailing something heavy, flat rate might save you money. If not, pick up a non-flat-rate priority mail box, that will ship based on weight and destination. Priority mail will arrive in no more that 5 days, and often after just 2.

If you are sending packages internationally, compare the rates of FedEx, UPS, and USPS to find the best option for where you are shipping, and how soon it needs to get there.


Sunday, December 18, 2011

Christmas Truffles

Looking for a lovely gift idea that you can whip up right at home? Truffles are a lovely gift to give and receive during the holidays, and they're not too hard on you, either.

While the Penguin Truffles that I posted this week are very labor intensive and tricky to do, these truffles are just as delicious and are significantly easier to make. In addition, truffles can be made ahead, which means that you have extra time to trim the tree, wrap presents, and run errands. 

The truffles recipes listed below are but two of countless variations, so you can adapt them to taste and mood. Wrap them in pre-made candy boxes with some colored tissue paper for a lovely present!

Dark Chocolate Rum Balls

Makes 30 truffles

400 grams good-quality dark chocolate, coarsely chopped (about 2.5 cups)
1/2 cup heavy cream
2 tbps rum (or any other liqueur)
375 grams dark chocolate melts
100 grams white chocolate melts

First, melt the 400 grams of dark chocolate in a metal bowl placed over a simmering pot of water (make sure the pot does not touch the water!). Stir continuously to avoid burning until all pieces are melted. Once the mixture is smooth, remove from heat and stir in the rum. Refrigerate, covered, for at least four hours or until the mixture is firm enough to roll into balls.

Line a tray with parchment paper. Roll 2 teaspoonfuls of chocolate mixture into a ball and place on the prepared tray. You might want to wear disposable latex gloves for this, as it can become messy . If you're not wearing gloves, make sure to wash your hands in very cold water so that your palms are cool and do not melt the chocolate. Repeat with remaining chocolate mixture. Place in the fridge for 1 hour or until firm.

Meanwhile, place the dark chocolate melts in a heatproof bowl over a saucepan half-filled with simmering water (make sure the bowl doesn’t touch the water). Stir with a metal spoon until smooth. Reduce heat to low and stir.

Line a tray with parchment paper and divide your truffles into 4 batches. Remove 1 batch from the fridge and, using a fork or truffle dipper,  dip the truffles (one at a time) in the melted chocolate to coat. Gently tap the fork or dipper on the edge of the bowl to allow excess chocolate to drip off and carefully place on the prepared tray. Repeat, in 3 more batches, with the remaining truffles and melted chocolate. Set aside for 10 minutes to set.

Place the white chocolate melts in a heatproof bowl over a saucepan half-filled with simmering water (make sure the bowl doesn’t touch the water). Stir with a metal spoon until chocolate melts and is smooth. Use a fork to drizzle the white chocolate over the truffles. Set aside for 5 minutes to set.

Keep your truffles in the fridge, covered, for up to a week before using!


Coffee / Chocolate Truffles

Makes 20 truffles

200 grams good-quality dark chocolate, chopped
1/3 cup heavy cream
2 tsps instant coffee powder OR 1/2 tsp vanilla extract
1/4 cup cocoa powder

These basic truffles can be altered to create new flavors. For coffee truffles, use coffee powder or use vanilla extract for basic chocolate!

Melt the chocolate in a metal bowl placed over a simmering pot of water (make sure the pot does not touch the water!) and stir continuously until melted. Once the mixture is smooth, remove from heat and add the coffee powder OR vanilla extract. Refrigerate, covered, for at least four hours or until the mixture is firm enough to roll into balls.

Line a baking sheet with parchment paper and, using 2 tsps of the mixture at a time, roll into balls. As I say above, you might want to use latex disposable gloves for this step. Once all the truffles have been rolled, dip them in cocoa powder to coat. 


Keep in the fridge until ready to use (up to a week!).

Thursday, December 15, 2011

Penguin Truffles

Christmas is a time for food and fun with friends and family, but it's also when you make those special dishes that you make only once a year. These penguin truffles make a fabulous gift or specialty at your next holiday party. The mixture of white and dark chocolate over a rich, creamy center makes for a real treat around the holidays.

My roommate sent me the recipe for Penguin truffles, which she found at "2 Stews," a cooking blog by a former flight attendant. They were too cute--not to mention, too delicious--to resist: a chocolate truffle sculpted to look like a penguin, dipped in white chocolate, and finished with a coat of dark chocolate.

I made two batches of these little critters this week (and that's enough for one year). Just a warning: these truffles are both time-consuming and labor-intensive so don't try to make them in a rush.

Sure they're tricky, but, hey, it's Christmas and these are sure worth the effort for the "oohs and ahs" and the delicious result.

Being a child at heart and having an excuse to play with food, I posed my penguins in various situations: attacking the Christmas tree, staring at the Christmas turkey, huddling around a chocolate egg, and marching in the snow...


The Recipe:

For the ganache:

12 ounces bittersweet chocolate

1 1/4 cups heavy cream

Break the chocolate into small pieces and process in a food processor until very fine. Heat the cream in a medium saucepan until just boiling and pour through the food processor feed tube in a steady stream, with the motor running. (If you don't have a food processor, you can chop the chocolate in a coffee-bean grinder, and just mix it into the cream in the saucepan.) Process (or mix) until smooth, just a few seconds. Transfer to a bowl to firm. This should take a few hours at room temperature. You may also put it in the refrigerator.


Rolling and dipping:

2 tbsps powdered sugar (for rolling)
12 ounces good quality white chocolate* (for dipping)
12 ounces bittersweet chocolate* (for dipping)

*Use couverture chocolate or tempered chocolate. Click here for video on tempering chocolate. You will need a candy thermometer for this step.


For the flippers:

1/4 cup slivered almonds

Using a teaspoon, scoop out balls of ganache and place on a parchment lined tray. Place in refrigerator to firm, about 30 minutes. Once firm, dust hands with powdered sugar and roll ball between your hands to smooth. Then continue rolling while pulling and shaping the top to resemble a small head with a drooped, thin pointy end (the beak). This can be frustrating, especially when the chocolate starts to melt. Take a deep breath, put them in the fridge, and have some cocoa.

To insert the slivered almonds for the flippers, take a knife and insert it about 1/2 inch deep at the placement and angle you want the flippers. Gently insert a slivered almond into the slit, rounded end facing out. You should have about 25-30 penguins. Return to tray and put in refrigerator to chill.

In the meantime, melt the white chocolate by breaking it into a medium bowl placed over a pot of hot water. The bowl must not touch the water and the water must not simmer, but just remain hot. Stir until melted and then take off of heat and cool until it is about 84 degrees or dab a small amount on your upper lip. It should feel slightly cool. Resting a penguin on a forks tines and holding over bowl of melted white chocolate, spoon the chocolate over the penguin to coat. Let excess drip off. Place on parchment to cool and harden. Continue coating all penguins.

Break the bittersweet chocolate into a medium bowl and place over hot water to melt in the same manner as the white chocolate. Once cool to 84 degrees, pick up penguins in the back behind the flippers, so as not to touch the tummy, and place on the tines of a fork. Holding over the bowl of bittersweet chocolate, gently spoon the chocolate down the back top and sides of the penguin. Carefully spoon a little down over the beak to form a point. Keep the tummy white and don't touch it or you'll get fingerprints on it. Let excess chocolate drip off and place on clean parchment to harden.

You're a champion.

Makes 25-30 Penguin Truffles. Lasts up to 2 weeks at cool room temperature.

Monday, December 12, 2011

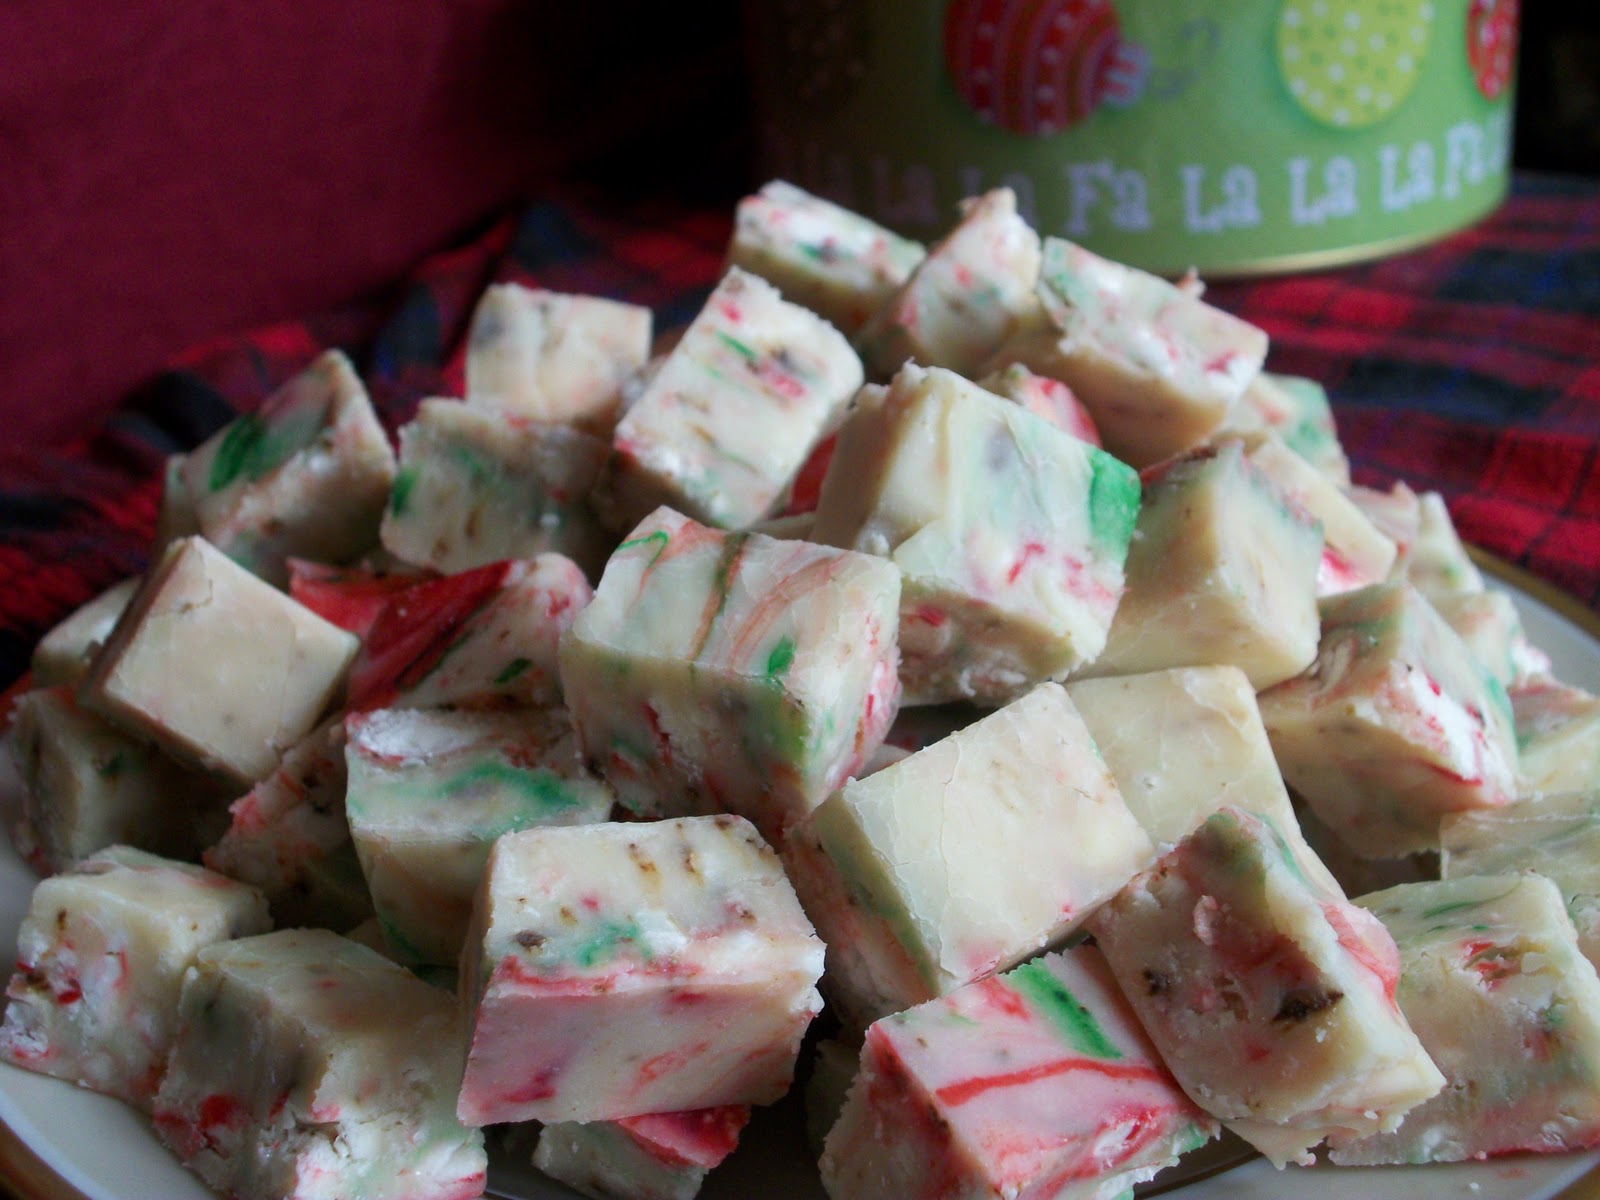
Peppermint Fudge


I love getting and giving presents from the kitchen. They're not only delicious to eat, but are the embodiment of the Christmas spirit--giving something from the heart and sharing with others.

At Christmas time, I tend to experiment with a lot of candies, which are a fabulous addition to your holiday cookie and cake repertoire. One thing that I love is that you can make and pack them ahead, and keep them in the fridge until you are ready to serve them or give them as gifts.

The recipes below for Candy Cane and Chocolate Peppermint Fudge are new to my recipe collection, but after seeing (and tasting!) the results, I can guarantee that I will be making them again!

These fudges are remarkably simple to make, and are not very labor intensive. In addition, the ingredients are inexpensive which means you don't need to break the bank. The result? A creamy and fresh minty fudge that your loved ones will be happy to open Christmas day.


Candy Cane Fudge


2 (10 ounce) packages of white chocolate chips
1 (14 ounce) can of sweetened condensed milk
1/2 tsp peppermint extract
1 1/2 cups crushed peppermint candy canes
1 dash of red and green food coloring

Take a medium saucepan and heat the sweetened condensed milk over medium-low heat. Add the chocolate chips, stirring frequently. Make sure that the chocolate does not start to bubble, which signals burning. Stir until smooth and until all of the chips have melted. Remove from heat. Stir in the peppermint extract and candy cane pieces and then carefully drop in 3 drops each of red and green coloring. Swirl the colors, but make sure not to stir too much.

Line a 8" or 9" square pan with tin foil and spread the fudge evenly. Cover with plastic wrap and refrigerate to set for at least 2 hours, or overnight.

Cut the fudge into whatever size pieces you would like and keep in a cool place.


Chocolate Peppermint Fudge


2 cups milk chocolate chips
1 cup semi-sweet chocolate chips
1 (14 ounce) can sweetened condensed milk
Dash of salt
1 tsp peppermint extract
1/4 cup crushed candy canes


Take a medium saucepan and heat the sweetened condensed milk over low heat. Add the chocolate chips, stirring frequently. Stir until smooth and until all of the chips have melted. Remove from heat and stir in the peppermint extract.

Line a 8" or 9" square pan with tin foil and spread the fudge evenly. Sprinkle the candy cane pieces on top and gently press them down so that they will set into the fudge. Cover with plastic wrap and refrigerate to set for at least 2 hours, or overnight.

Cut the fudge into whatever size pieces you would like and keep in a cool place.

Saturday, November 26, 2011

Holiday Helper : Building a Bar

The holidays are a time of family, food, and entertaining. Chances are that you will participate in or host at least one gathering this holiday season, whether it be the office Christmas party, a dinner party with the in-laws, or a secret Santa gift swap with friends. Whatever your holiday traditions are, it's always fun to try some new ideas to make your holiday gatherings run more smoothly.

For that reason, over the next month, I'm going to be posting suggestions to make your holiday entertaining easier--so you can stop worrying about entertaining and start enjoying your holidays more.

This inaugural holiday entertaining post focuses on a delicate, and potentially costly, task: building a home bar.

The Problem

1. Space, Money, Utility--The first problem arises with complicated drinks that require a slew of ingredients to achieve a particular flavor. One of the roadblocks that I regularly meet when planning parties or researching different drinks is the number of ingredients I don't have. Cocktails are fun and festive, but they often require an array of ingredients that I don't have room for, don't want to buy, and will need to find other uses for. Want to make an Elderflower Collins (a variation on the Tom Collins)? Great, but what are you going to do with the remaining 9/10 of the bottle of elderflower syrup? If you need 5 ingredients for one cocktail and each bottle is $15, that's $75 right there.

2. Tools--Many cocktails require special tools to taste their best. For example, mojitos require crushed mint leaves and lime. While you can crush mint leaves with a spoon, or chop them very finely, the best tool to have on hand is a muddler--essentially a mortar and pestle. Cocktail shakers, strainers, and different glasses are all different tools that professional bartenders have on hand, but that are sometimes beyond the scope of a home bar.

3. Complicated Drinks--As hosts, we always aim to impress, a quality that often gets us in trouble. In an effort to keep all our guests happy, we want to offer the best quality, the most variety to suit everyone's taste, and the fanciest or tastiest drinks. This not only requires buying a lot of expensive and often unnecessary things, but also tires us out when we try to do too much.

The Solution

1. Quality and Selectivity--The problem of not having a wide enough array of alcohols and liqueurs, or not having a use for odd-ball ingredients is easily solved with careful planning. Planning a holiday cocktail menu? Choose 3 drinks to fit the occasion or the season, and make sure that at least one ingredient among them is shared. For example, if you're planning on making Cran-tinis, White Russians, and Blackberry Crushes you can use vodka as the base for each.

In the weeks ahead of your party, stock up on these basic alcohols that are essential to a home bar (italicized alcohols are necessary):

Vodka
Rum
Gin
Whiskey
Champagne
Tequila
Bourbon

These are the base for most cocktails and will offer your guests a great deal of variety. You might also want to pick up a liqueur like Kahlua or Campari.

As for oddball ingredients, sometimes you will need them. That's ok, as long as you can see yourself using them in the future. Buy the smallest bottle so that you don't need to worry about storage or waste.

Another quick note: in the weeks before the Holidays, many liquor stores will sell gift sets. Though they are sometimes pricey, they are often the same price as the free-standing bottle. If you need to buy a bottle of Vodka and a Cocktail Shaker, why not buy the Grey Goose gift set that includes the two for a good price? Free glasses and cocktail-making tools are always welcome.

2. Multi-tasking tools--Some tools will be necessary for your home bar. They will not only help you make better drinks, but will last as a piece of your cocktail arsenal for years to come. Glassware can get complicated, so you don't need to worry about having anything fancier than a set of highballs or a couple martini glasses.

Other than that, these are the tools you should definitely have:
A Boston cocktail shaker
A fine strainer
A long spoon
A jigger (or 1/4 cup size Pyrex)

3. Simple and High-Quality--There's nothing as disappointing as a poorly-executed cocktail. When you're hosting a party, the last thing you want is to be overwhelmed by making drinks. You're supposed to be having fun, not being the bartender. Learn some simple drinks that you can execute well and quickly. If there's anything a little complicated, practice it before the day of the party. Another excellent choice is making punches or using multi-serving recipes for cocktails. Punches are festive and decorative and will serve the most guests the fastest.

Happy Entertaining!


Photo courtesy of MarthaStewart.com

Thursday, November 24, 2011

It's as easy as pumpkin pie


Thanksgiving is not just about dinner; it's an all-day affair in the kitchen. It's a holiday centered on food: on food you eat only once a year, on traditions, on coming together to prepare a feast. So, as you and your family come together for the feast, the last thing you need--as you simultaneously watch the cranberries, the turkey, the stuffing, the breads, and the rolls--is something complicated and time-consuming.

Every year my family and I make this pie on Thanksgiving. It's not what you'd expect. It's not a complex array of ingredients tactfully concocted together and lovingly prepared for hours. It's your average pie made from prepared ingredients, and cooked on the morning of the big turkey day.

This is Libby's famous pumpkin pie recipe. Who's Libby? Oh well. You know the Libby's brand pumpkin purée? Yeah, that's her.

The Recipe:

1 (15oz) can Libby's pumpkin purée
3/4 cup sugar
1/2 tsp salt
1 tsp ground cinnamon*
1/2 tsp ground ginger*
1/4 tsp ground cloves*
2 large eggs
1 can (12oz) evaporated milk
2 pre-made 9-inch pie crusts OR 1 pre-made 9-inch deep-dish pie crust (either plain or graham cracker)

*if you do not have all of these spices readily available, feel free to substitute the cinnamon, cloves, ginger combination with 2 tsps of pumpkin pie spice (available from McCormick)

Preheat your oven to 425'F. Combine the dry ingredients in a small bowl. In another, larger bowl, whisk together the eggs and the pumpkin purée, then add the dry ingredients. Slowly add the evaporated milk, whisking after each addition. Place the pie crusts on a cookie sheet to avoid any spillage or leaking. Fill the pie crusts, so that they are 3/4 full and place them on the center rack of the oven. Bake at 425 for 15 minutes, and then reduce the heat to 350'F, baking for 40-50 minutes or until a knife inserted in the center comes out clean. Cool on a wire rack for 2 hours, serve with whipped cream.

Tuesday, November 8, 2011

Carrot Ginger Layer Cake with Lemon Cream Cheese Frosting


Yesterday, we celebrated my mom's birthday. She and my father had been away for the weekend, and so I had unfortunately missed the actual day; however, that wasn't going to stop me from surprising her when they got home with an already-cooked dinner and a birthday cake.

My family and I have been suffering from a sugar overload over the past week, which I am fully ready to accept as my own fault. Halloween left in its wake not only a trail of candy wrappers and smashed pumpkins, but a lot of tummies sore from too much indulgence.

Instead of making a sweet and traditional birthday cake laden with fruit and chocolate, I opted for a more modest alternative fitting both to the season and our craving for the savory.

I decided to halve the recipe for Martha Stewart's Carrot Ginger Layer Cake (see the original at http://www.marthastewart.com/344218/carrot-ginger-layer-cake-orange-cream-cheese-frosting?czone=food/cake-center/favorite-cake-recipes ) and make some slight variations in hopes of creating the perfect surprise cake.

In my version, I not only halved the recipe for a smaller (aka *not* four layer) cake, but also used ground ginger instead of fresh and a more savory lemon cream cheese frosting. The cake turned out moist and flavorful, and, above all, not too sweet. My mother was delighted with her celebration. All in all it was a not-so-sweet victory with a great deal of spice!

The Recipe:

For the cake:

1-1/2 cups all-purpose flour
1/2 cup (3 ounces) chopped pecans
1/2 pound large carrots, peeled
2 large eggs, room temperature
1/4 cup buttermilk
1/2 teaspoon pure vanilla extract
1 cup sugar
3/4 cup canola oil
1 tablespoon freshly grated ginger OR 1/2 teaspoon ground ginger and a dash of lemon juice
1 teaspoon baking powder
1/2 teaspoon baking soda
1/2 teaspoon salt
1/2 teaspoon ground cinnamon

For the frosting:

6 oz unsalted butter, room temperature
12 oz chilled cream cheese
1 cup confectioners' sugar, sifted
1 teaspoon lemon extract
2 tablespoons freshly grated ginger OR 1 tsp ground ginger

Heat oven to 375 degrees and lay pecans in a single layer on a baking sheet. Toast until lightly golden, for about 5 minutes. Be sure to check them very frequently as nuts burn fast and without warning. Take them out and let them cool. Reduce oven temperature to 300 degrees.

Meanwhile, using the smallest holes of a grater, grate your carrots and place them in a bowl. Mix together with eggs, buttermilk, vanilla, sugar, canola oil, and ginger until well-incorporated.

In a medium bowl, whisk together flour, baking powder, baking soda, salt, and cinnamon. Using a rubber spatula, fold the flour mixture into the carrot mixture until combined. Fold in the toasted pecans. Divide the misture evenly between two buttered and floured pans.

Bake until a knife inserted into the middles comes out clean, about 30-40 minutes. Remove pans from oven, and transfer to a wire rack to cool, 15 minutes. Turn cakes out onto rack; let stand until completely cool.

Meanwhile, make your frosting by creaming the butter with an electric mixer until fluffy, about 2 minutes. Add cream cheese, and beat until well combined and fluffy, about 2 minutes more. Add sugar, lemon extract, ginger, and salt, and beat for 5 minutes.

Frost your cake and make sure to keep it cool until serving.

Bon appetit!

Friday, October 28, 2011

A New York City Halloween: Chocolate Rats

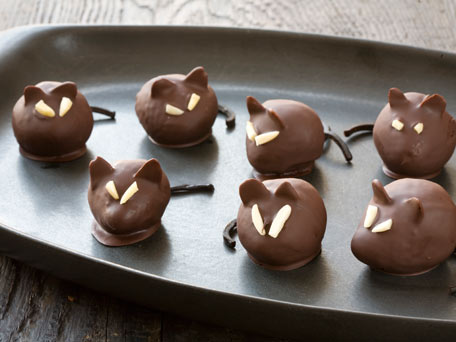
It's Halloween time in the city, and that means all kinds of spooks and scares. If you're throwing / going to a Halloween party this weekend, you might consider these ironic and creepy treats--chocolate covered strawberries made to look like rats.

They're easy to make, and promise to spook your guests.

This recipe and photo come from Kitchen Daily.


The Recipe:

20 large strawberries
40 sliced almonds
2 3.5-oz bittersweet or semisweet chocolate bars, coarsely chopped and melted
40 slivered almonds
20 2-inch pieces of black licorice laces

Line a baking sheet with waxed or parchment paper. Trim a small piece from one side of each strawberry so they can rest flat on waxed paper. Insert 2 sliced almonds about 1 inch from pointed end of strawberry to make the ears on the rat. Repeat with remaining strawberries.

Insert a fork into the wide end of a strawberry. Holding the strawberry on fork, spoon the melted chocolate over the fruit to coat, allowing any excess chocolate to drip off. Place on baking sheet. While chocolate is still wet, arrange 2 slivered almonds to create eyes, then place licorice pieces at the bottom of the wide end of the strawberry to form a tail. Repeat with remaining strawberries, chocolate, almonds, and licorice. Chill until firm.

Boo!


Read more: http://www.kitchendaily.com/recipe/chocolate-dipped-rats-149369/#ixzz1c5utlmhD

Monday, October 24, 2011

Alice's Teacup Pumpkin Scones

You read that correctly. This is the recipe for Alice's Teacup Pumpkin Scones. As in, the actual Pumpkin Scone recipe from the famed New York bakery and tea-parlour, Alice's Tea Cup.

I love Alice's Tea Cup. I am pretty sure that every woman loves Alice's Tea Cup. What's not to love? As an Alice in Wonderland lover, I love not only the spectacular creations that come from the kitchen--from their famous scones to crisp tea sandwiches, tea-infused cocktails, and grilled items-- but also love the decor, ambiance, and whimsy of the place, which welcomes children of all ages for tea, parties, lunches, and dinners. It is a decidedly feminine environment, great for a girls' night or tête-à-tête with a friend, but it's also lovely for couples' lunches and brunches, as well as drinks. I have brought members of the male sex to Alice's and, despite their apprehensions, they survived and emerged pleased and well-fed.

The standard order from Alice's is a pot of tea and two scones. You choose from any of their hundreds of varieties of teas and from their daily selection of scones, which includes standard and novelty flavors. Old-faithfuls include buttermilk, pumpkin, ham and cheese, and some kind of berry, whereas novelties range from coconut to oatmeal cranberry and various chocolates.

Pumpkin is one of my, and everyone's, favourites. It's just so good. And here it is, courtesy of my friend Liz who obtained it by clandestine measures (or perhaps just read the Alice's Tea Cup Cookbook which I should have bought ages ago).

Just in case you're interested, here's the Amazon product page:
http://www.amazon.com/dp/0061964921/?tag=googhydr-20&hvadid=8537715684&ref=pd_sl_j1i67kwfs_b


Tea and scones from a recent Alice's visit.

The Recipe:

The scones:

3 cups all-purpose flour
1/3 cup sugar
1/2 tsp baking soda
2-1/2 tsp baking powder
3/4 tsp kosher salt
2 tbsps ground ginger
2 tbsps ground cinnamon
1-1/2 sticks unsalted butter, cut into 1/2 inch pieces
1-1/4 cups buttermilk
1 cup canned pumpkin puree (all pumpkin, not pumpkin pie filling)
2 tbsp pure vanilla extract

The glaze:

2 sticks unsalted butter
1 cup firmly packed light brown sugar
1/2 tsp freshly squeezed lemon juice
1/4 tsp kosher salt
1/2 cup heavy cream

Preheat the oven to 425 degrees F.

In a large mixing bowl, combine the flour, sugar, baking soda, baking powder, salt, ginger, and cinnamon. Then, with clean hands, work the butter into the dry mixture until it is thoroughly incorporated and has the consistency of fine breadcrumbs. Make a well in the center of the dry ingredients, and pour the buttermilk, pumpkin puree, and vanilla extract into the well. Still using your hands, combine the ingredients until all the dry mixture is wet, but do not knead!

I am warning you now: you might want to get some disposable latex gloves for when you're handing the dough. It is, without exaggeration, the most unruly dough I have ever encountered--very sticky, impossible to work with without having it attach itself to you, and hard to flatten into a disk in the next step.

Turn the mixture onto a floured surface and gather the dough together, then gently pat the dough to make a disk about 1 1/2 inches thick. Make sure you four the surface well, or it will be hard to work the dough. Using a 3 or 3 1/2 inch biscuit cutter (or an upside down glass or cup), cut out as many scones as you can and lay them on a nonstick baking sheet. Gather the remaining dough together lightly to cut out more scones--just don't knead the dough too much, and make sure to keep it floured. You will be rewarded with the lovely scone texture when they're done!

Bake the scones for about 12 minutes, or until lightly browned. Let the scones cool slightly on the baking sheet (about 20 minutes) before glazing them.

While the scones are cooling, prepare the caramel glaze: Place the butter, brown sugar, lemon juice, and salt in a saucepan over medium head and whisk gently until the mixture is smooth. Just as the mixture comes to a light boil, add the heavy cream and reduce the heat to low. Whisk well for 2 minutes, or until the glaze is thickened and smooth; then remove the pan from the heat.

To glaze a scone, hold it by the bottom, dip the top in the warm caramel glaze, and place it back on the baking sheet.

Friday, October 14, 2011

Elegant Autumn Desserts : Spicy Maple and Pumpkin Flan


For those of you who did not read my post from this past weekend, I had the real treat of taking a cooking class at the Institute of Culinary Education in the Flatiron District of Manhattan. The class, entitled Elegant Autumn Desserts and taught by executive pastry chef, Vicki Wells, covered many sophisticated autumn desserts that look fantastic but are relatively simple to make.

As promised, I am re-making each of the desserts from the class at home to (a) see if they work in a non-magical cooking class setting, (b) eat them again, and (c) share them with you.

The first of these desserts in this series is the Spicy Maple and Pumpkin Flan, which was probably my favorite.

This flan is not difficult or time consuming, but does take a few tricks to make it work. The result is an incredibly smooth and subtle maple and pumpkin flavor that is to die for.

The Recipe

For the flan molds:

1 cup sugar
1 tsp heavy cream
1 tbsp butter
2 tsps rum

First, set up about 8 small ramekins in a deep baking pan so that they are ready when you pour in the caramel.

You will now need to caramelize the sugar. This can be a tricky task, especially if you have not made caramel before. I will give you one warning I wish I had had when I first made caramel last year: DO NOT TOUCH IT. EVER.* Put your sugar in a saucepan and add just enough water to moisten it. This will not be much. You do not want to bathe the sugar, just to make it damp. Then put it on the stove over medium heat and let it warm. You will not want to stir it with a spoon because the sugar will solidify. Just make sure to swirl the pan often, to move the mixture around. The mixture will soon start to develop big bubbles and will then very suddenly start to turn color. While the sugar is cooking, prepare your cream, butter, and rum and have them on standby. As soon as the sugar turns a caramel brown, remove it from heat and add the other ingredients. Swirl and let it combine. Then, pour a small amount into the ramekins (about 1/2") and let them cool and set.

For the flan:

1-1/2 cups heavy cream
1/2 cup milk
5 egg yolks
5 tbsps sugar
1-1/2 ounces maple syrup
3-1/2 ounces canned pumpkin
1/8 tsp Green Mountain maple extract (available at Fairway!)
1/4 tsp ground cloves
1/4 tsp ground ginger
1/4 tsp cinnamon

Preheat oven to 300' F.

Dry roast the spices in a medium saucepan. You will just need to heat them for a few seconds, until they release an intense aroma. As soon as this happens, add the cream and milk and whisk. Add half the sugar and bring to a boil, whisking. Then remove from heat and let cool 10 minutes.

Meanwhile, combine the yolks very well with a whisk. Add the other half of the sugar, the maple syrup, and the maple extract.

Temper the cream to the yolk mixture. Pour in a little of the cream and whisk well before adding another small amount. Do this until it is all combined. Add the pumpkin and stir very well, until smooth. Strain and remove the foam.

Pour into the caramel filled molds. Now, create a water bath with boiling water. The water should go 1/3 of the way up the ramekin sides. Bake them until they are set and no longer jiggle. Let them in room temperature and transfer to the fridge when cooled slightly.

When ready to serve, turn the ramekin over a plate and tap to release the flan.


*Sugar's boiling point is much higher than water, so not only is it scalding, but it will also solidify, while still scalding you, which makes it impossible to get off before severe damage is done. I was dumb. Learn from me.

Sunday, October 9, 2011

Elegant Autumn Desserts at the Institute for Culinary Education

Yesterday morning, I had the pleasure of attending my first class at the Institute for Culinary Education, located on 23rd street between 5th and 6th avenue. As I had been getting more interested in baking and cooking, and as I had been devoting more time to it recently, I became interested in finding recreational cooking or baking classes in the city that would (a) get me out of the house, (b) let me meet new people, and (c) let me learn some very valuable kitchen skills.

But where was I going to find these cooking classes that I had in mind? I Googled it.

The Institute for Culinary Education offers a full range of recreational cooking classes for those interested in cooking, baking, wine and bar-tending, and cheese.

The class that caught my eye was "Elegant Autumn Desserts" taught by chef Vicki Wells, the Executive Pastry Chef at Buddakan who has worked with Sarabeth’s Kitchen, Hotel Plaza Athenée, Maxim’s, Montrachet, Rakel’s, Metro, El Dorado Petit, Le Bernardin and Trattoria Dell’Arte.

The class was limited to 10 people and was spread over four hours on a Saturday morning. The price was reasonable, considering the time in the kitchen, the price of the materials, and the fact that you got to take bags of goodies home.

Within our four hours we made a Warm Apple Cider Cake with Bourbon Vanilla Ice Cream, Spicy Maple Pumpkin Flan with Gingersnaps, Pears Poached in Pinot Noir, Double Chocolate Shortcakes with Oven-Roasted Cranberries, and a Warm Greenmarket Apple Charlotte with Clove Molasses Ice Cream.

Each one was relatively simple to make, and came out looking and tasting divine. Each used tools and ingredients that are easily available and that shouldn't be too much of a drain on the budget.

The Cider Cake was built on a great basic recipe that takes a normal spice cake and adds onto it with variations of the liquid used. While we used bourbon, you can substitute any alcohol or even coffee as the liquid. The cake was filled with a tangy cider reduction and topped with bourbon vanilla ice cream, which was so good that I might invest in an ice cream machine.


The Pumpkin Flan might have been my favorite of all the desserts. It incorporated the welcome fall flavors of maple syrup and pumpkin into a smooth flan topped with a caramel layer and sauce. The flan was served with a dollop of fresh whipped cream and a gingersnap as garnish.


The Chocolate Shortbread tasted very similar to a chocolate mousse that Alex makes. It took a chocolate shortbread biscuit which was then topped with cranberries and chocolate pastry cream. This was another dessert that I could never tire of eating.


The Apple Charlotte was a variation on a French apple upside-down tart, which was made with a brioche crust and filled with caramelized apples and apple compote. A perfect version of an apple tart for fall.


I will undoubtedly be attempting these recipes again over the next few weeks, and with each attempt, I will post the recipe for the desserts I have described above. So, stay tuned, and get hungry!

Also make sure to check out ICE's list of classes at : http://rec.iceculinary.com/