Showing posts with label finger-food. Show all posts

Friday, October 28, 2011

A New York City Halloween: Chocolate Rats

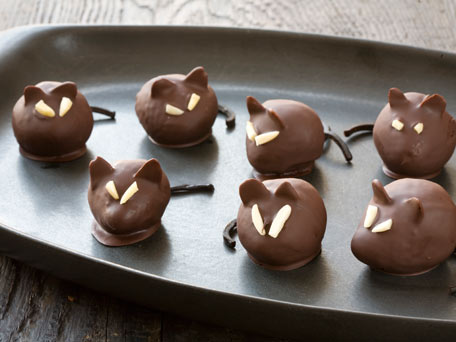
It's Halloween time in the city, and that means all kinds of spooks and scares. If you're throwing / going to a Halloween party this weekend, you might consider these ironic and creepy treats--chocolate covered strawberries made to look like rats.

They're easy to make, and promise to spook your guests.

This recipe and photo come from Kitchen Daily.


The Recipe:

20 large strawberries
40 sliced almonds
2 3.5-oz bittersweet or semisweet chocolate bars, coarsely chopped and melted
40 slivered almonds
20 2-inch pieces of black licorice laces

Line a baking sheet with waxed or parchment paper. Trim a small piece from one side of each strawberry so they can rest flat on waxed paper. Insert 2 sliced almonds about 1 inch from pointed end of strawberry to make the ears on the rat. Repeat with remaining strawberries.

Insert a fork into the wide end of a strawberry. Holding the strawberry on fork, spoon the melted chocolate over the fruit to coat, allowing any excess chocolate to drip off. Place on baking sheet. While chocolate is still wet, arrange 2 slivered almonds to create eyes, then place licorice pieces at the bottom of the wide end of the strawberry to form a tail. Repeat with remaining strawberries, chocolate, almonds, and licorice. Chill until firm.

Boo!


Read more: http://www.kitchendaily.com/recipe/chocolate-dipped-rats-149369/#ixzz1c5utlmhD

Sunday, October 23, 2011

Spooky Meringue Ghosts


Last year, I was invited to a Halloween party hosted by my boyfriend's childhood friends who I had never met. In short, I was going to a party with a bunch of people who I did not know, but wanted to impress. I decided that the best way to get to the hearts of a crowd of strangers was to seduce their stomaches with clever and delicious Halloween desserts. (This is not how I make friends usually). I needed something Halloween-y but that didn't look like I tried too hard, something simple to make with a big impact.

I settled on these adorable ghost meringues, which were a snap to make and a big success. Not only were they fun, easy, and economical, but they were also a huge hit.

This recipe, from joyofbaking.com uses few ingredients and can be whipped up--literally!--in a hurry. So, when you're looking for finger food for your guests this Halloween, look no further; these little ghosts will spook their way into stomachs and hearts.

The Recipe:

4 large egg whites (120 grams)

1/2 tsp cream of tartar (or 1/2 tsp white vinegar)

1 cup (200 grams) superfine sugar (if you don't have superfine sugar simply take 1 cup (200 grams) granulated white sugar and process it for about 30 seconds in a food processor)

1/2 tsp pure vanilla extract

Preheat oven to 200 degrees F and place the rack in the center of the oven. Line a baking sheet with parchment paper.

If you are lucky and have a pastry bag, fit it with a 1/2 inch plain tip. If you're doing this budget-style, take a gallon ziploc bag and cut a small hole in one of the corners. It's cheap, disposable, and you can enlarge the hole if you need to.

Use your electric mixer to beat the egg whites on low-medium speed until foamy. Add the cream of tartar and continue to beat the whites until they hold soft peaks. Add the sugar, a little at a time, and continue to beat until the meringue holds very stiff peaks. Beat in the vanilla extract. You will know it is ready when it holds stiff peaks and does not feel gritty when rubbed between your fingers ("grit" is undissolved sugar).

Before placing the meringue ghosts on the cookie sheet, place a little of the meringue on the underside of each corner of the parchment paper, which prevents the paper from sliding. Transfer the meringue to the pastry bag and, holding the bag perpendicular to the baking sheet, pipe 2 inch high mounds of meringue. Working in a beehive shape is best. You can also make your ghosts smaller if you like.

For eyes, you can use candy eyes, mini chocolate chips, or icing. If doing candy or chip eyes, place them in now. If doing icing, wait until cooled.

Bake the meringues for approximately 1 - 1 1/2 hours or until they are dry and crisp to the touch, but not so that they brown. Turn off the oven, open the door, and leave the meringues in the oven to finish drying several hours, or even overnight.

The Meringue Ghosts will keep several days at room temperature--if they last, that is!


Read more: http://www.joyofbaking.com/halloweenrecipes/MeringueGhosts.html#ixzz1bZv6pkiF
Saturday, October 15, 2011

Potluck Pizza Puffs


My friend, Sophie, was hosting a potluck dinner for her birthday party, and I had no clue what to bring.

After spending quite a bit of time looking through recipes for various lasagnas, enchiladas, frittatas, chilis, and chowders, I stumbled upon a recipe for pizza puffs, individual pizza muffins. Not only did they sound tasty, but they were also already divided and ready to serve upon completion--perfect!

These were not only very easy and inexpensive to make, but easy to transport. It wasn't long before all the puffs had gone up in smoke!

This recipe comes from "Plain Chicken":

The Recipe:

3/4 cup flour
3/4 tsp baking powder
1/2 tsp garlic powder
3/4 cup whole milk
1 egg, lightly beaten
4 oz mozzarella cheese, shredded (about 1 cup)
2 oz mini turkey pepperoni, (about 1/2 cup)
4 oz low-fat sausage, cooked and crumbled
1/2 cup pizza sauce (for dipping, if desired)

Pre-heat the oven to 375° and grease a 12 cup muffin pan. In a large bowl, whisk together the flour, garlic powder and baking powder; whisk in the milk and egg. Stir in the mozzarella, sausage and pepperoni; let stand for 10 minutes.

Stir the batter and divide among the muffin cups. Bake until puffed and golden, 25 to 30 minutes.

Meanwhile, microwave the pizza sauce until warmed through. Serve the puffs with the pizza sauce for dipping.


Images courtesy of Plain Chicken.